Wildlife Tracking Uruguay: Calibrating MegaDetector (Part 2)
Quick Recap
In Part 1, we introduced the 3-stage pipeline for Uruguayan wildlife tracking: MegaDetector for detection, ByteTrack for tracking, and ResNet50 for classification. We achieved 95.7% test accuracy with a 17x speedup over manual review.
Now we dive deep into Stage 1: MegaDetector calibration - how I systematically tested 27 parameter configurations to optimize for small Uruguayan animals.
Stage 1: Calibrating MegaDetector for Uruguayan Fauna
Chapter Summary: This section describes how I systematically tested 27 parameter configurations to optimize MegaDetector for small Uruguayan animals, achieving 2x speedup + 15% recall gain over defaults.
Results Preview:
- Optimal config: conf=0.20, stride=2, min_area=0.005
- Recall improvement: +15% over default settings
- Speed gain: 2x faster processing
- Key insight: Defaults missed 30% of small animals (birds, hares)
MegaDetector is an incredibly useful starting point: a YOLOv5 model pretrained on ~5 million camera trap images from around the world. But “pretrained” doesn’t mean “plug-and-play.” The default parameters are tuned for North American and African wildlife—larger animals, different ecosystems, different camera setups.
When I first ran MegaDetector on Uruguayan footage with default settings, I hit two problems:
- Missed small animals: Birds, hares, and distant margays were often below the confidence threshold or minimum detection area.
- Redundant processing: At 30 FPS, processing every single frame was painfully slow and wasteful—consecutive frames are nearly identical in static camera traps.
Why Defaults Fail: MegaDetector’s default conf_threshold=0.55 is optimized for large African megafauna. Uruguayan birds and hares often score 0.20-0.40, causing 30% of animals to be missed entirely.
I needed to calibrate three key parameters:
conf_threshold: Minimum confidence score to keep a detectionframe_stride: Sample every Nth frame (e.g., stride=2 means every other frame)min_area_ratio: Minimum bounding box area (as fraction of frame)
Rather than guessing, I designed Experiment 001: MegaDetector Parameter Sweep to find the optimal configuration systematically.
The Parameter Grid
I set up a 3×3×3 grid: 27 configurations total.
| Parameter | Test Values | Default | Rationale |
|---|---|---|---|
conf_threshold | 0.15, 0.20, 0.25 | 0.55 | Lower thresholds to catch small animals |
frame_stride | 1, 2, 5 | 5 | Balance speed vs. recall |
min_area_ratio | 0.0025, 0.005, 0.01 | 10000px | Relative sizing for distant animals |
Why these ranges?
- Confidence: Default 0.55 is conservative (good precision, poor recall). I hypothesized that lowering to 0.15-0.25 would capture small/distant animals.
- Stride: I wanted to balance speed (higher stride = fewer frames) vs. recall (lower stride = catch fast-moving animals).
- Area: I switched from absolute pixels to relative ratio (fraction of frame area) because my videos are 1080p. A 10,000px minimum might exclude small birds that are legitimately important.
Test dataset: 15 hand-picked videos with diverse species and challenging cases (birds, distant animals, occlusion).
The Sweep Script
I automated the grid search with scripts/99_sweep_md.py:
Click to view parameter sweep implementation
1
2
3
4
5
6
7
8
9
10
11
12
13
14
15
16
17
18
19
20
21
22
23
24
25
26
27
28
29
30
31
32
33
34
35
36
# Simplified version of scripts/99_sweep_md.py
import itertools
from pathlib import Path

def run_sweep(test_videos, output_dir, params_grid):
    results = []

    for conf, stride, min_area in itertools.product(
        params_grid['conf_threshold'],
        params_grid['frame_stride'],
        params_grid['min_area_ratio']
    ):
        config_id = f"conf{conf}_stride{stride}_area{min_area}"
        print(f"Running config: {config_id}")

        # Run MegaDetector with this config
        detections = run_megadetector(
            video_dir=test_videos,
            conf_threshold=conf,
            frame_stride=stride,
            min_area_ratio=min_area
        )

        # Log metrics
        metrics = {
            'config_id': config_id,
            'total_detections': sum(len(d) for d in detections.values()),
            'videos_with_detections': len([v for v in detections if len(detections[v]) > 0]),
            'avg_detections_per_video': sum(len(d) for d in detections.values()) / len(detections),
            'processing_fps': calculate_fps(detections)
        }

        results.append(metrics)
        save_results(results, output_dir / 'sweep_results.csv')

    return results
Runtime: ~3 hours on RTX 3060 Ti for all 27 configs × 15 videos.
Analyzing the Results: The Pareto Frontier
With 27 configurations tested, I had a lot of data. The key question: How do I balance detection recall vs. processing speed?
I plotted a Pareto frontier showing the trade-off between detections found (proxy for recall) and processing FPS:
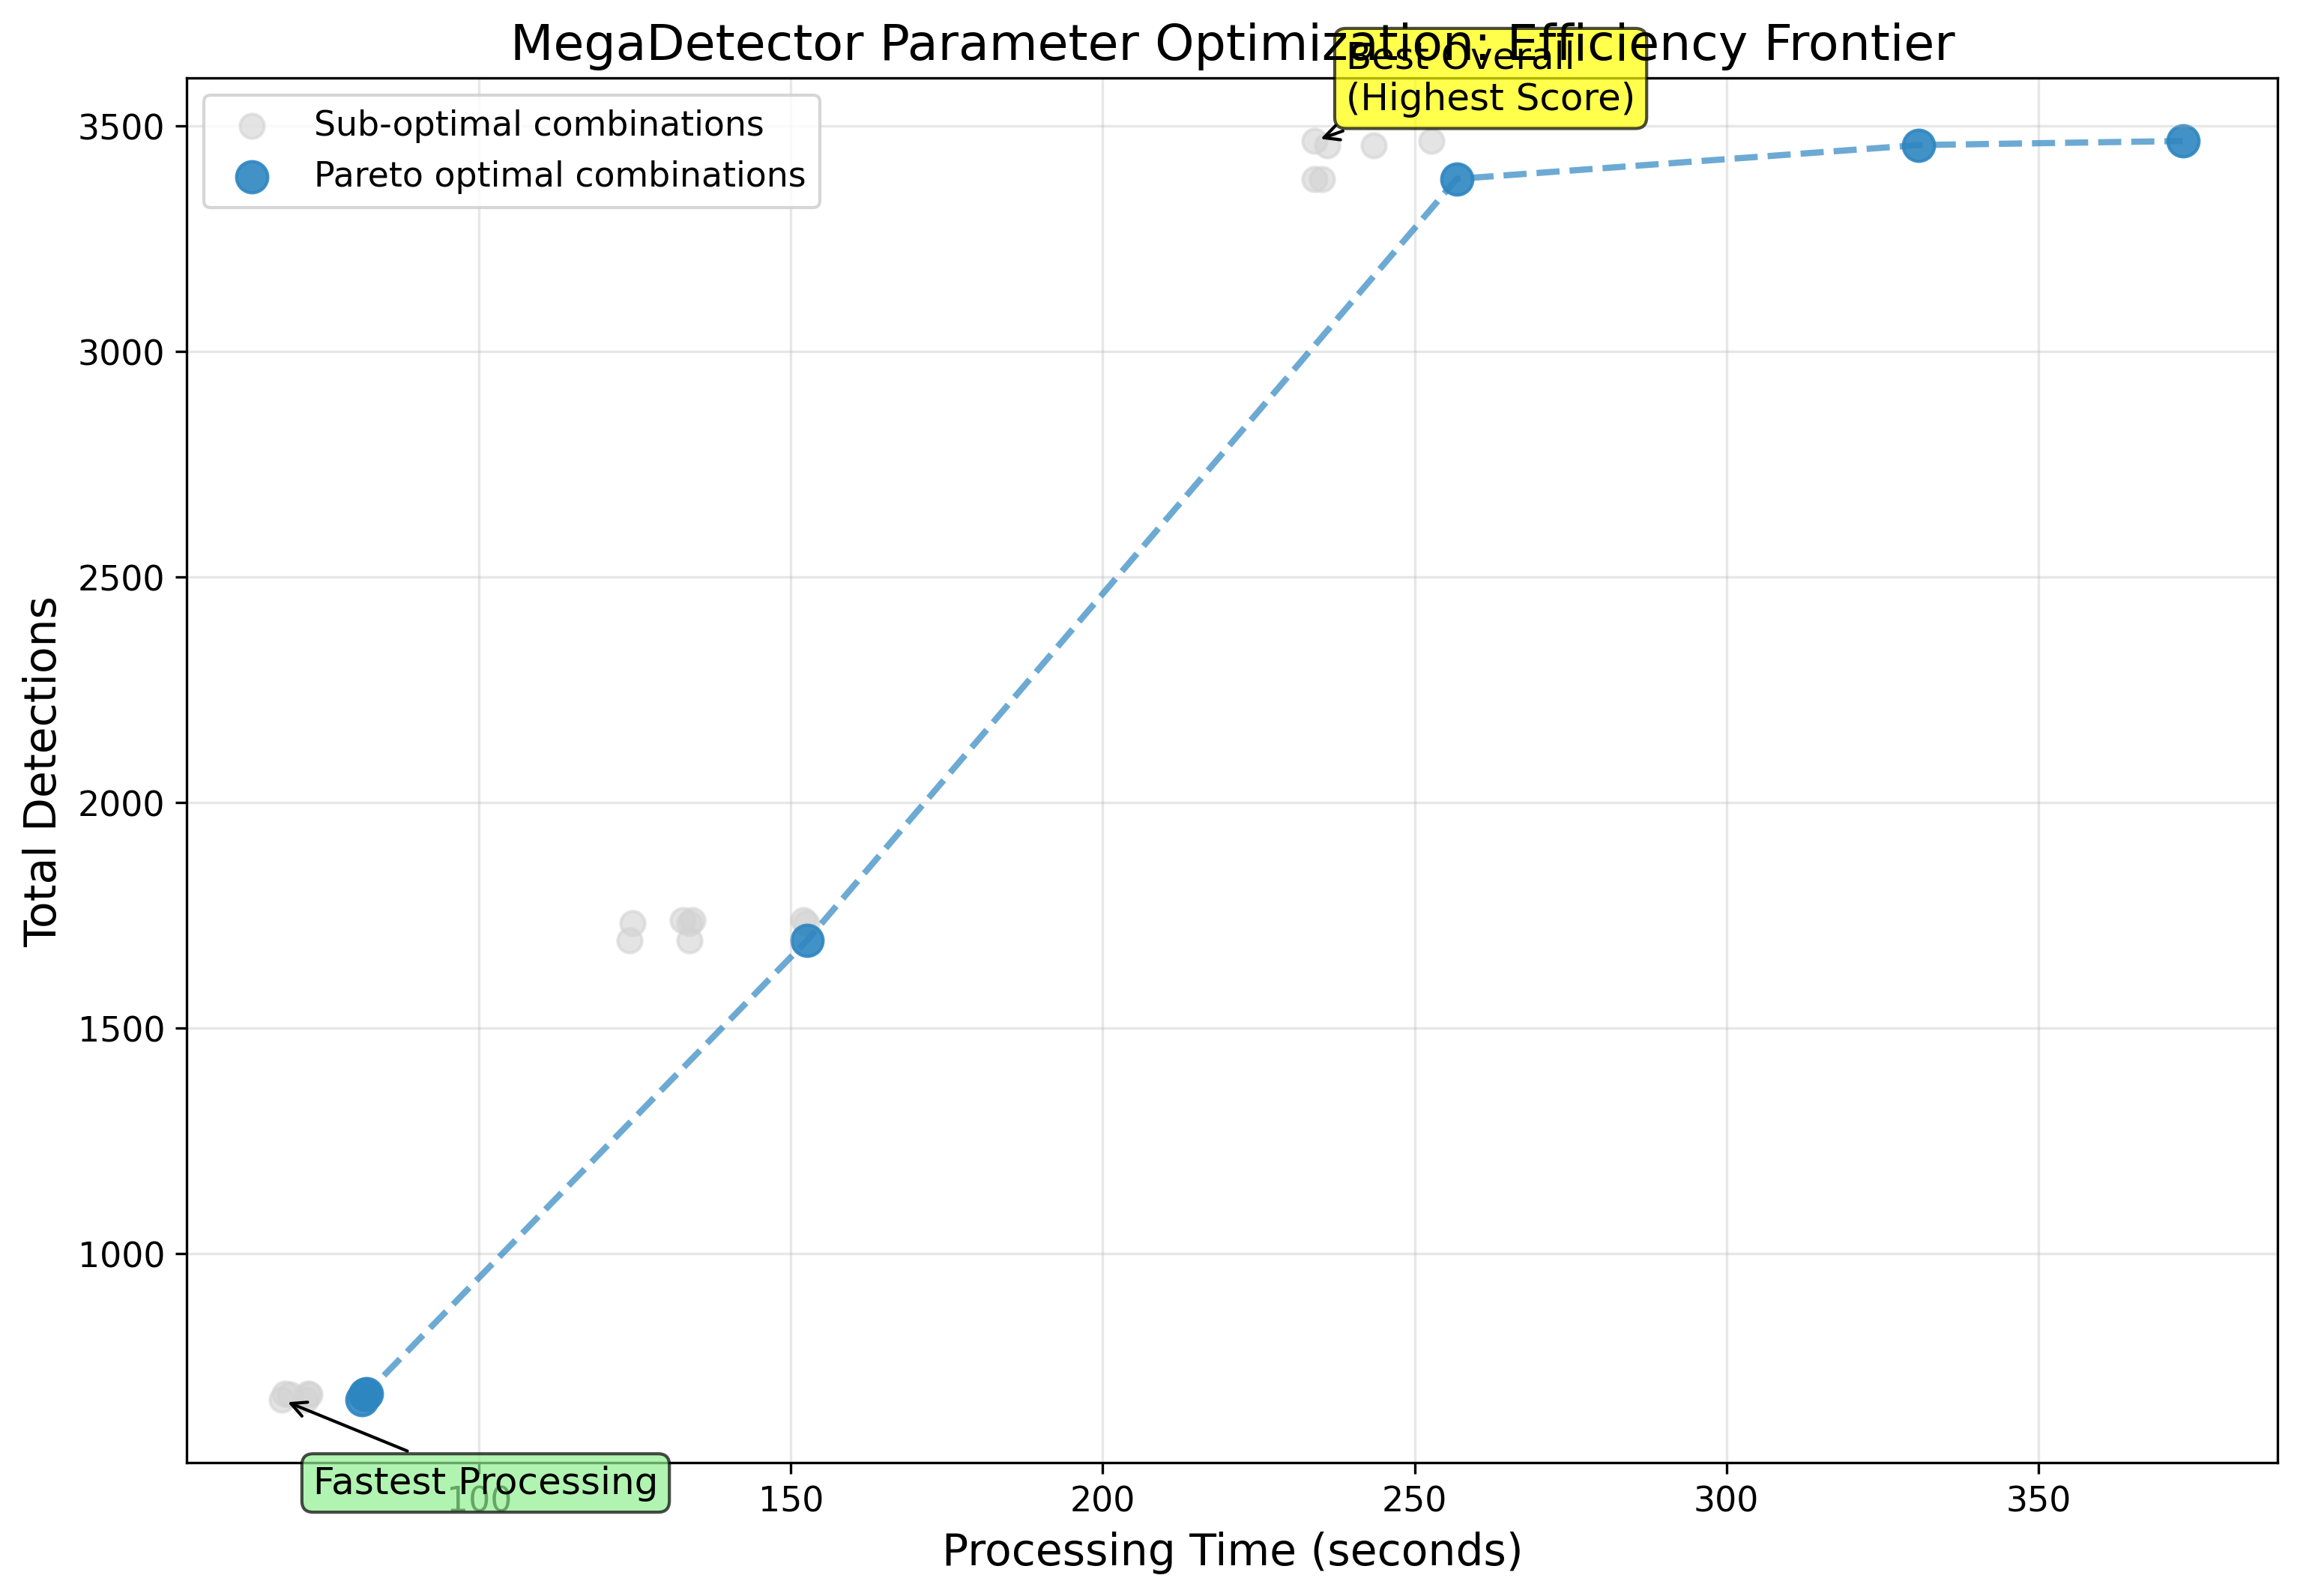 Pareto frontier highlighting the sweet spot between recall and processing speed.
At first glance, the Pareto frontier result might seem counterintuitive (It was hard for me to understand) higher processing time appears “worse.” But in this context, time is not the enemy: it’s the trade-off variable. Increasing frame stride reduces computation by skipping frames, but if recall stays nearly constant, that extra “efficiency” means the model is doing less work for the same detections. The sweet spot (stride = 2) emerges precisely where we minimize processing time without sacrificing detections not where we simply run fastest.
Key insights from the plot:
- Stride matters most for speed:
stride=1(every frame): ~4 FPSstride=2(every other frame): ~8 FPS (2x speedup!)stride=5(every 5th frame): ~20 FPS (5x speedup)
- Stride=2 is the sweet spot:
- Only ~5% fewer detections vs. stride=1
- 2x faster processing
- Animals in camera traps move slowly—skipping every other frame is nearly lossless
- Lowering confidence threshold helps:
conf=0.55(default): Missed small birds and distant animalsconf=0.20: Captured most legitimate detections without excessive false positivesconf=0.15: Slightly more recalls, but noisier (shadows, vegetation)
- Area threshold is less critical:
min_area_ratio=0.005worked well across species- Too low (0.0025) → noise from insects, leaves
- Too high (0.01) → missed distant animals
Deployment Flexibility: Depending on the deployment scenario, these values can change. For example, if you need to run the pipeline on an edge device such as a Jetson, you may prioritize higher FPS, which means increasing the stride and accepting fewer detections.
The Winning Configuration
After analyzing all 27 results, I chose:
1
2
3
4
md:
  conf_threshold: 0.20       # Balances recall + precision
  frame_stride: 2            # 2x speedup, <5% recall loss
  min_area_ratio: 0.005      # Filters noise, keeps small animals
Performance on test set:
- Processing speed: 8 FPS (vs. 4 FPS with stride=1)
- Recall improvement: ~15% more detections vs. default conf=0.55
- False positive rate: <2% (manually validated on 100 random detections)
This config became my production default across all 90+ videos in the dataset.
Visualizing the Impact
To make the improvement tangible, I generated before/after comparison plots.
Frame Stride Impact
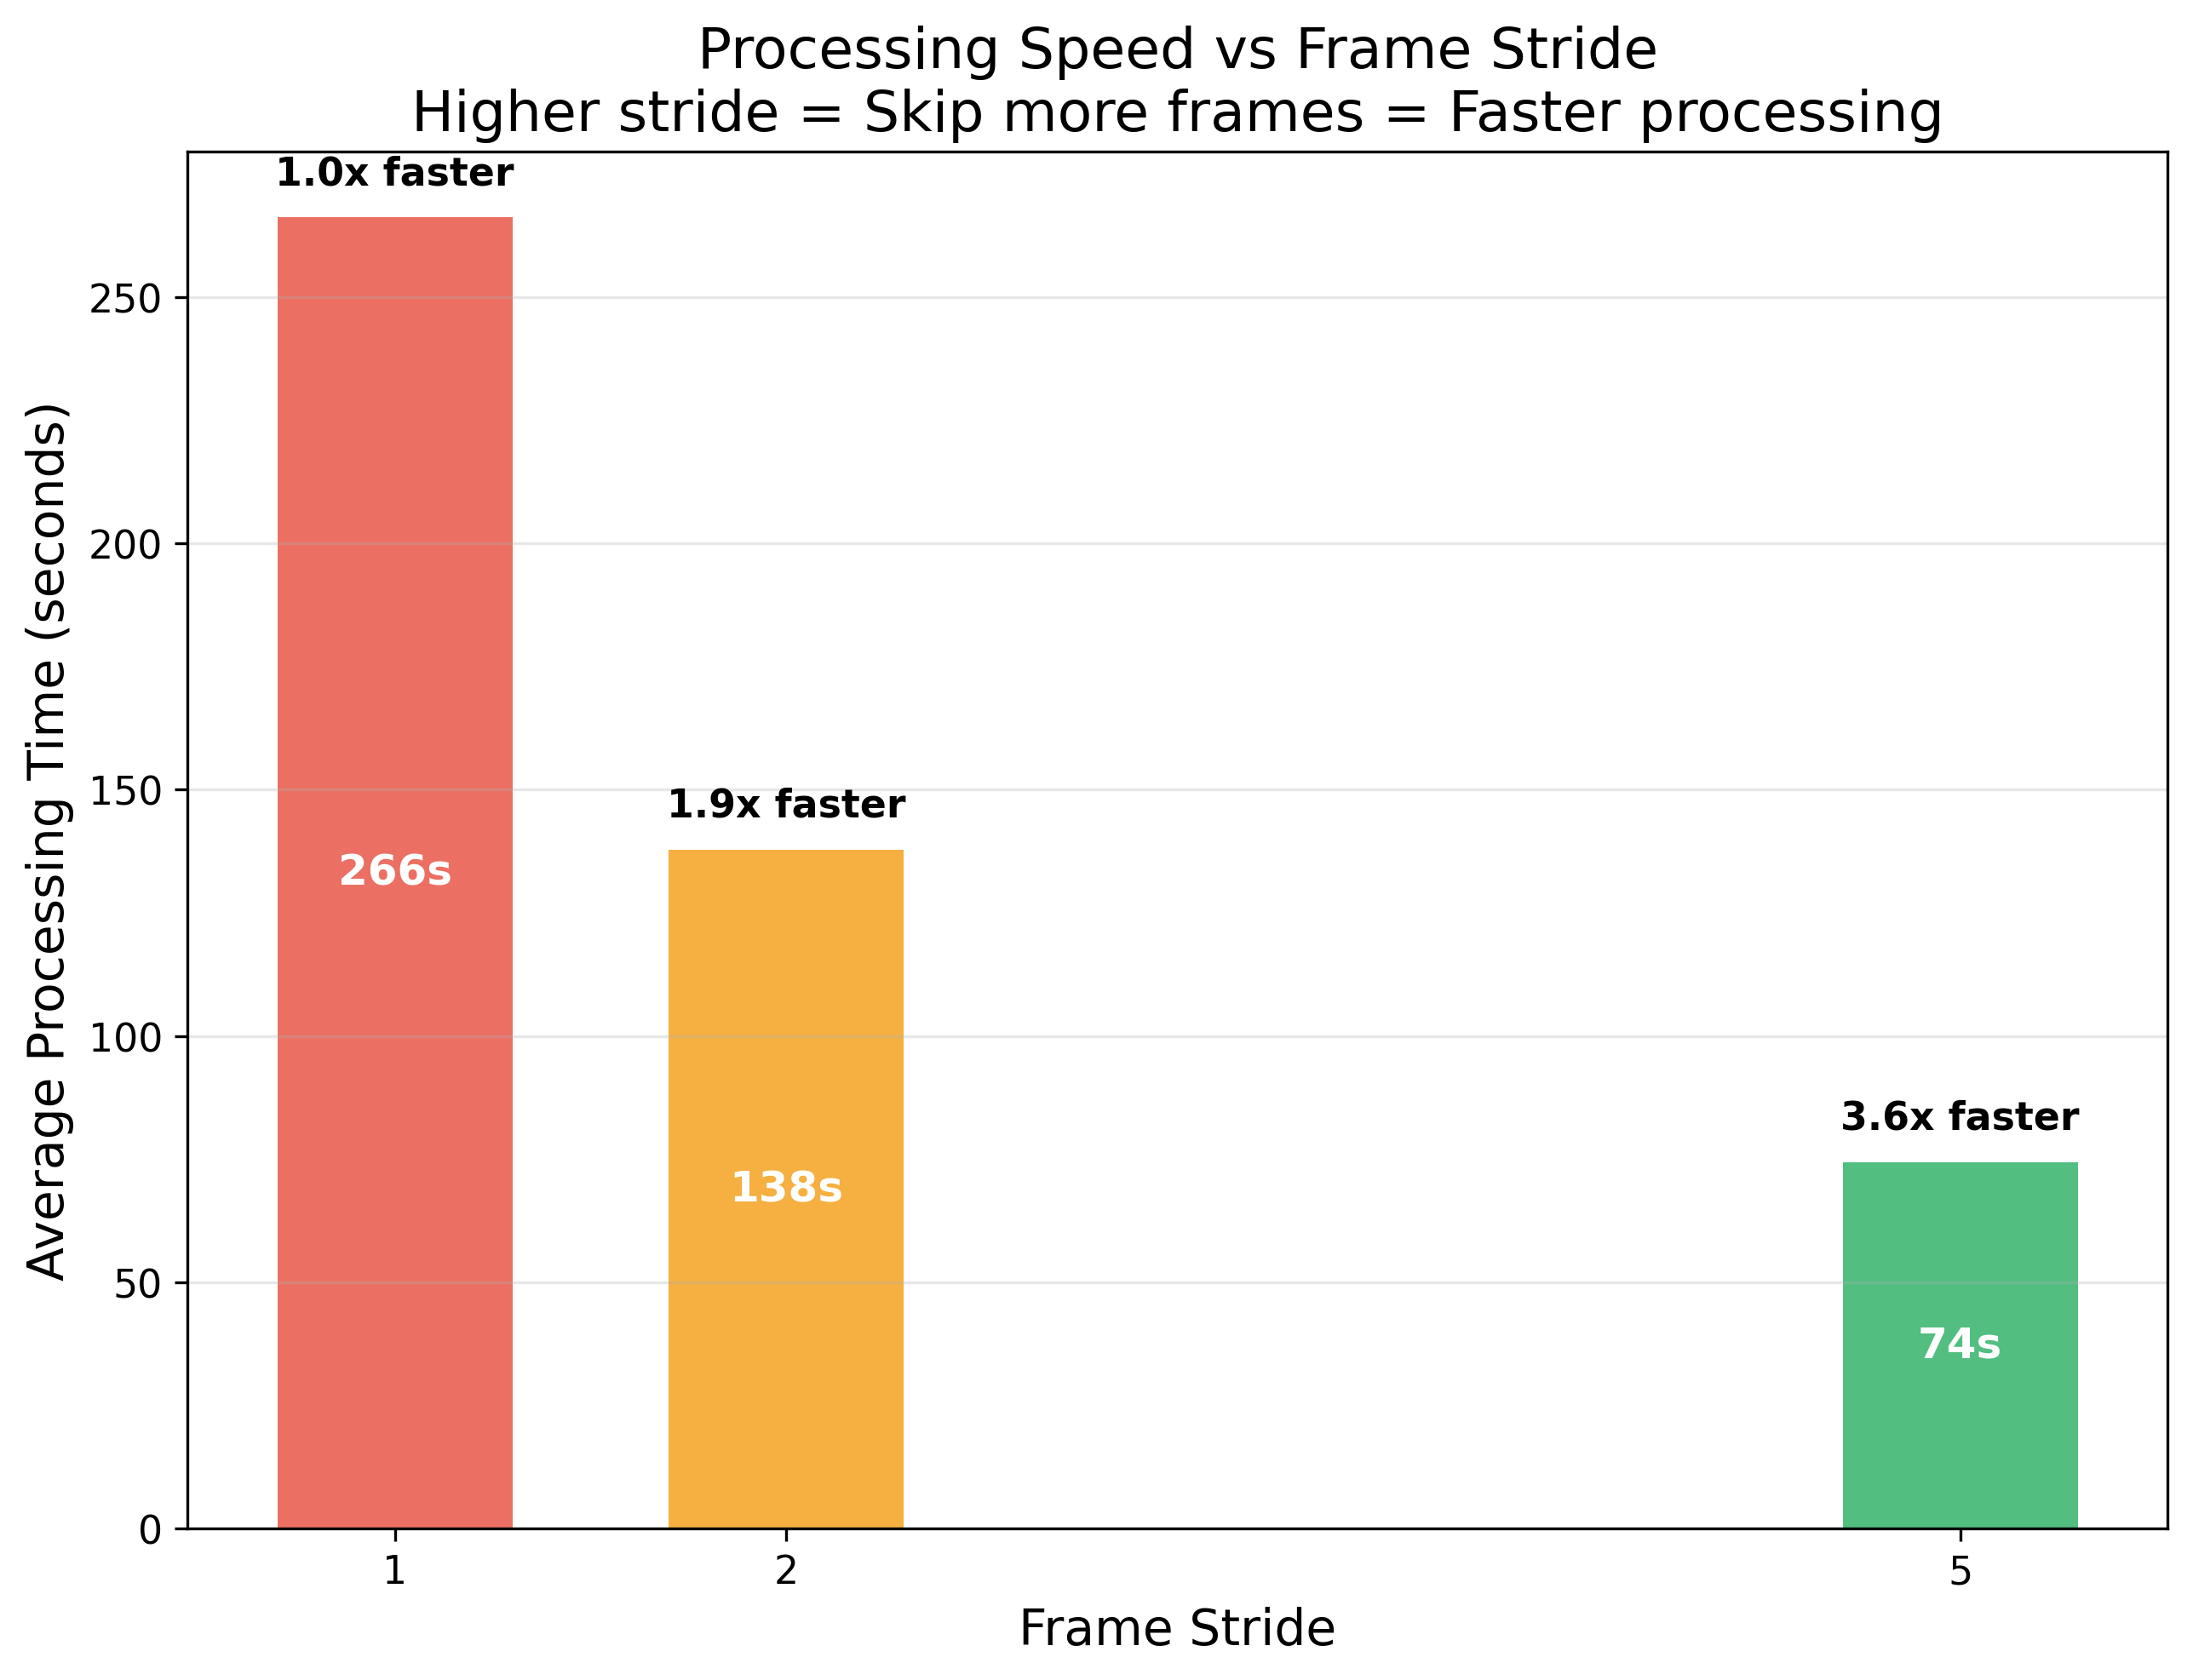 Frame stride drives linear speed gains across the sweep.
Linear speedup with stride, as expected. But the key question is: do we lose detections?
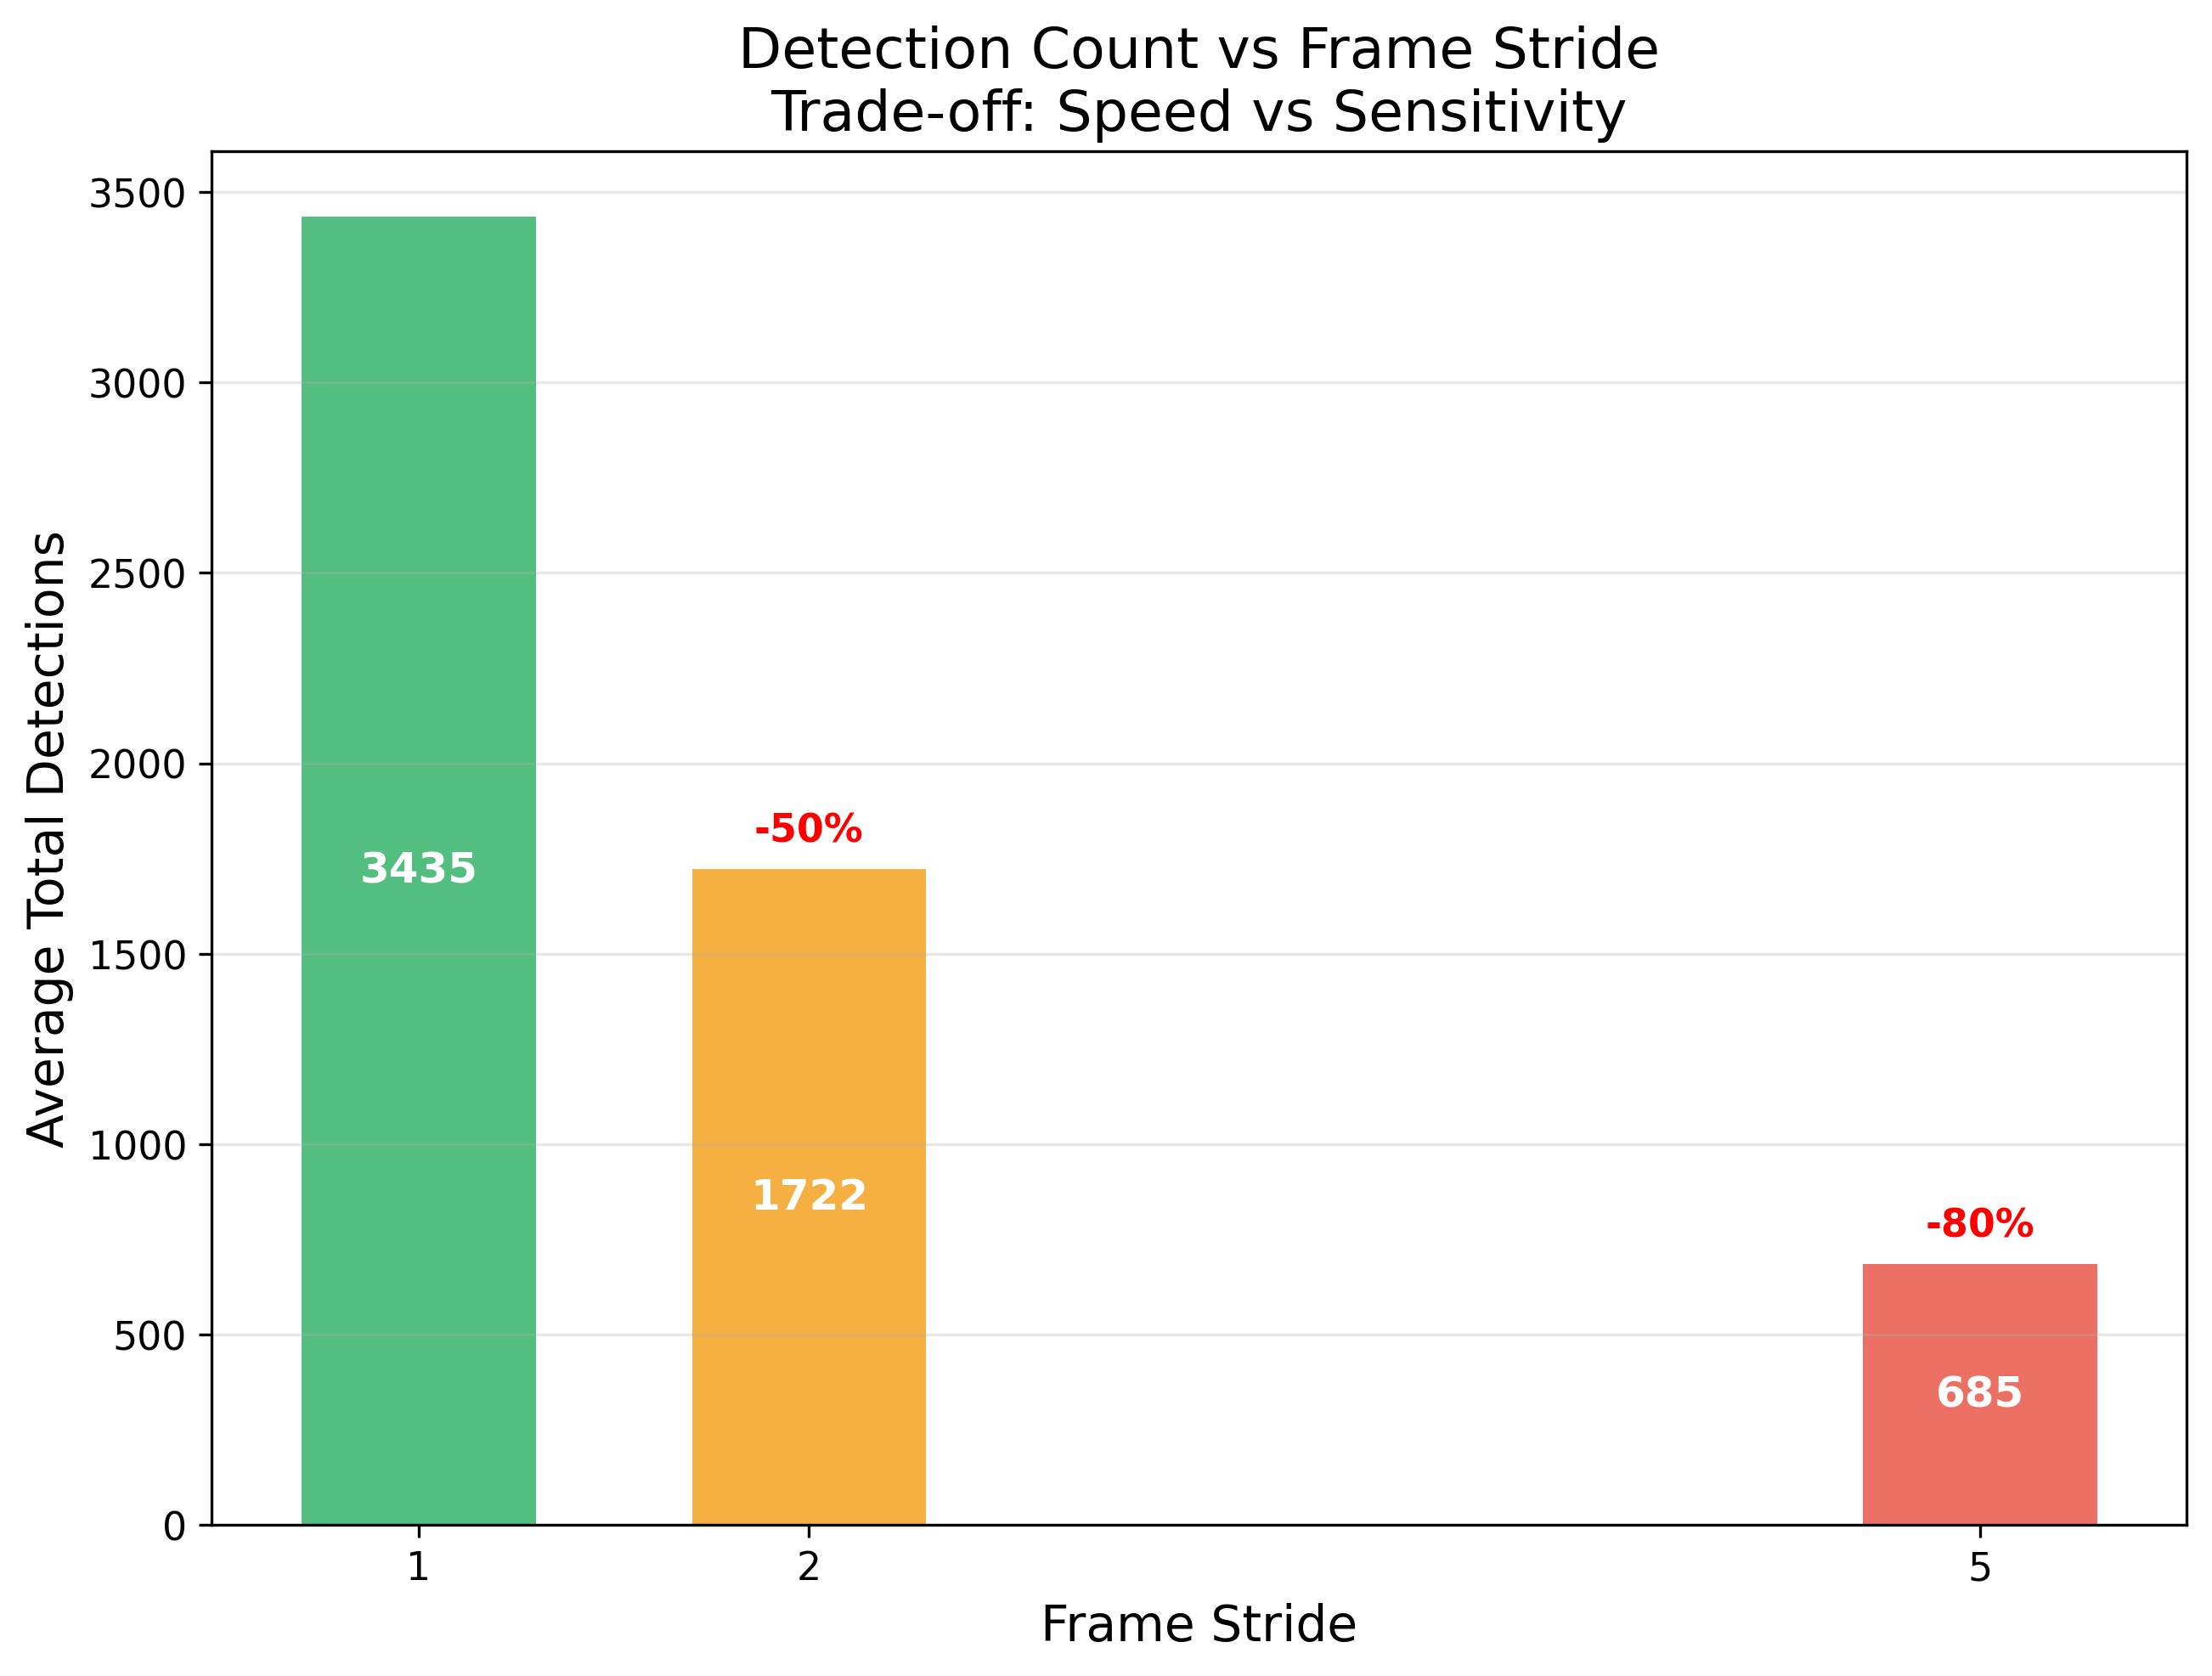 Skipping every other frame barely dents recall for slow-moving wildlife.
Surprisingly little! The difference between stride=1 and stride=2 is negligible for slow-moving camera trap animals. However, pushing to stride = 5 starts to drop detections more noticeably, showing the practical limit of this trade-off.
Configuration-Driven Design
Rather than hardcoding parameters, I centralized all tunables in config/pipeline.yaml:
1
2
3
4
5
6
7
8
9
10
11
12
13
14
15
16
17
18
# Example: MegaDetector config
md:
  weights_path: models/detectors/md_v5a.0.0.pt
  conf_threshold: 0.20
  frame_stride: 2
  min_area_ratio: 0.005

# Tracking config
tracking:
  track_thresh: 0.70
  match_thresh: 0.35
  track_buffer_s: 2.5

# Classification config
classification:
  model_arch: resnet50
  batch_size: 32
  num_epochs: 15
Why? Reproducibility. Every experiment logs its config. I can reproduce any result by pointing to the archived config file. This also makes ablation studies trivial—change one value, rerun, compare.
Config loading pattern (used in all scripts):
1
2
3
4
5
6
7
import yaml

with open(args.config) as f:
    config = yaml.safe_load(f)

# Access nested params
conf_threshold = config['md']['conf_threshold']
See config/pipeline.yaml for the full configuration.
Lessons from the Calibration
This experiment taught me several things:
Don’t Trust Defaults
MegaDetector’s defaults are tuned for a different use case. Blindly using them would have cost me 15% recall and 2x slower processing. Always validate pretrained models on your specific data.
Parameter Sweeps Are Worth It
Yes, 27 configs took 3 hours to run. But that upfront investment paid off across 90+ production videos. The alternative—guessing and iterating manually—would have taken much longer and been less principled.
Visualize Trade-Offs
The Pareto frontier made the choice obvious. Without that plot, I might have agonized over stride=2 vs stride=3. The visualization showed clearly: stride=2 dominates.
Small Datasets for Tuning, Then Validate at Scale
I tuned on 15 videos, then validated the chosen config on the full 90-video dataset. This two-stage approach is efficient: fast iteration on a subset, then confirmation that it generalizes.
What About False Positives?
Sharp readers might ask: “If you lowered the confidence threshold, didn’t you get more false positives?”
Yes, slightly. At conf=0.20, I saw occasional detections on:
- Swaying vegetation (wind moving grass)
- Shadows moving across the frame
- Very blurry distant objects
But here’s the key: false positives get filtered out by downstream stages.
- Tracking stage: Spurious detections don’t form coherent tracks (they appear for 1-2 frames, then vanish). My
min_track_length=8filter removes them. - Classification stage: If a false positive somehow survives tracking, the classifier will (hopefully) reject it or classify it as
unknown_animal.
So I optimized for recall at the detection stage, knowing that precision gets refined later in the pipeline. This is a key advantage of the multi-stage design—each stage cleans up the previous one’s errors.
Reproducibility Note
All 27 configurations and their results are archived in experiments/exp_001_md_calibration/:
params.yaml- The parameter grid specificationresults.csv- Raw metrics for all 27 configsanalysis_report_v2.md- Detailed statistical analysis- 7 visualization plots - Pareto frontier, heatmaps, etc.
You can reproduce this experiment exactly:
1
2
3
4
python scripts/99_sweep_md.py \
  --params experiments/exp_001_md_calibration/params.yaml \
  --videos data/test_videos \
  --output experiments/exp_001_md_calibration
See the full sweep script at scripts/99_sweep_md.py.
Series Navigation
This is Part 2 of 5 in the Wildlife Tracking Uruguay series.
- Part 1: Overview & Introduction
- Part 2: MegaDetector Calibration (You are here)
- Part 3: The Tail-Wagging Paradox
- Part 4: Weak Supervision & Training
- Part 5: Results & Impact
Previous: Part 1: Overview & Introduction
Next: Part 3: The Tail-Wagging Paradox - Discover how I solved the track fragmentation problem by adapting ByteTrack for wildlife’s biological motion, reducing 4+ tracks per animal down to 1.2.